Wi-Fi Protected Setup (WPS) is a standard of the Wi-Fi Alliance that simplifies the registration process of end devices in an encrypted WLAN. Thanks to WPS, the WLAN password does not have to be configured on the client. There are four different WPS methods.
In today’s hyperconnected world, where wireless networks have become an indispensable part of our daily lives, it’s crucial to understand the fundamental technologies that enable seamless connectivity. Among the many acronyms and jargon surrounding wireless networking, WPS (Wi-Fi Protected Setup) stands out as a vital yet often misunderstood concept. Whether you’re setting up a new router or troubleshooting connectivity issues, having a clear understanding of WPS can save you time, effort, and frustration.
In this blog post, we will delve into the world of WPS, exploring its purpose, functionality, and how it simplifies the process of connecting devices to a Wi-Fi network. We’ll break down the intricacies of WPS and shed light on its security features, empowering you to make informed decisions when it comes to safeguarding your wireless connections.
So, if you’ve ever wondered what WPS is all about or find yourself puzzled by the mysterious WPS button on your router, this blog post will serve as your comprehensive guide. Whether you’re a tech enthusiast, a novice user, or anyone in between, join us as we unravel the enigma of WPS and discover the key to seamless wireless connectivity.
Contents
- What is WPS?
- Purpose and Benefits of WPS
- How WPS Works
- Security Concerns with WPS
- Configuring and Using WPS
- What Happens When I Press the Wps Button On My Router
- Common FAQs about WPS
- Can WPS be disabled on a router?
- Is WPS supported by all devices?
- How secure is WPS?
- Can WPS be used for guest networks?
- What are the limitations of WPS?
- How can I protect my network from WPS vulnerabilities?
- Can I use WPS without a physical button?
- Does disabling WPS improve security?
- Can I use WPS with a wired connection?
What is WPS?
WPS, or Wi-Fi Protected Setup, is a standardized wireless network security protocol that simplifies the process of connecting devices to a Wi-Fi network. It was developed to provide an easy and convenient method for users to set up secure wireless connections without the need for extensive technical knowledge or manual configuration.
Traditionally, connecting a device to a Wi-Fi network involves entering the network’s SSID (Service Set Identifier) and its corresponding passphrase or security key. This process can be cumbersome, especially for less technically inclined users. WPS addresses this challenge by introducing a simplified approach to establishing secure connections.
The primary purpose of WPS is to enhance the ease of Wi-Fi network setup by enabling devices to connect with a simple push-button method or a PIN code. It eliminates the need to enter lengthy passphrases manually and reduces the chances of human error during the setup process.
WPS operates through two primary methods: the Push Button Configuration (PBC) and the PIN method. In the PBC method, users press a physical button on the Wi-Fi router and then initiate the connection on the device within a specific timeframe. With the PIN method, the router or device generates a unique eight-digit PIN, which is then entered into the other device for authentication.
While WPS offers convenience and ease of use, it’s important to note that some security concerns have been raised regarding its implementation. Certain vulnerabilities, such as brute-force attacks on the PIN, have been identified, which can compromise the security of the network. As a result, disabling WPS if it is not required or using alternative methods, such as entering the Wi-Fi network’s passphrase manually is recommended.
Understanding WPS gives users the knowledge to make informed decisions about their network security and ensures a seamless and secure Wi-Fi connection setup process.
Purpose and Benefits of WPS
The purpose of WPS (Wi-Fi Protected Setup) is to simplify and expedite connecting devices to a Wi-Fi network, particularly for users who may have limited technical expertise or prefer a more straightforward setup experience. By eliminating the need for manually entering complex network information, WPS offers several benefits:
- Ease of Use: WPS provides a user-friendly and intuitive method for connecting devices to Wi-Fi networks. With just a push of a button or the entry of a PIN code, users can establish a secure wireless connection without the need to configure network settings manually.
- Time Efficiency: Traditional Wi-Fi network setup can be time-consuming, especially when entering lengthy passphrases. WPS significantly reduces the setup time by streamlining the connection process, enabling devices to join the network quickly and effortlessly.
- Accessibility: WPS promotes inclusivity by making Wi-Fi network setup accessible to a broader range of users. It eliminates the technical barriers that may prevent individuals with limited technical knowledge or disabilities from connecting their devices to a network.
- Convenience: With WPS, users don’t need to remember or enter complex passphrases, which can be prone to errors or forgotten altogether. The simplified setup process ensures convenience for both first-time setup and subsequent device connections.
- Enhanced Security Features: While convenience is a core aspect of WPS, it also includes security features to protect wireless connections. By using encryption protocols like WPA2 (Wi-Fi Protected Access 2) or WPA3, WPS ensures that devices connect to the network securely and safeguard sensitive data transmitted over the Wi-Fi connection.
- Standardized Compatibility: WPS is a standardized protocol that is widely supported across various devices and Wi-Fi routers. This ensures compatibility between devices from different manufacturers, making it easier to connect devices from different brands to the same network.
- Flexibility: WPS offers multiple connection methods, including the push-button configuration (PBC) and PIN method, providing users with flexibility based on their device capabilities and preferences.
While WPS provides convenience and ease of use, it’s worth noting that some security concerns have been associated with its implementation. Users should be aware of these vulnerabilities and take necessary precautions to maintain the security of their networks.
How WPS Works
The WPS (Wi-Fi Protected Setup) process involves a series of steps that allow devices to securely connect to a Wi-Fi network. Here’s an overview of the typical WPS process:
- Enable WPS: Start by enabling the WPS feature on the Wi-Fi router or access point. This can usually be done through the router’s administration interface or settings.
- Device Initiation: On the device you want to connect to the Wi-Fi network (e.g., a smartphone, tablet, or laptop), activate the WPS setup process.
- WPS Method Selection: Choose the desired WPS connection method—either the push button method or the PIN method—depending on the capabilities of your device and router.
- Connection Establishment: Depending on the selected method, the device will establish a connection with the Wi-Fi router using WPS.
- Authentication: The Wi-Fi router verifies the device’s credentials to ensure it has permission to join the network.
- Connection Completion: If the authentication is successful, the device is granted access to the Wi-Fi network, and the connection is established.
WPS Push Button Method
The WPS push button method is the most common and straightforward way to establish a Wi-Fi connection. Here’s how it works:
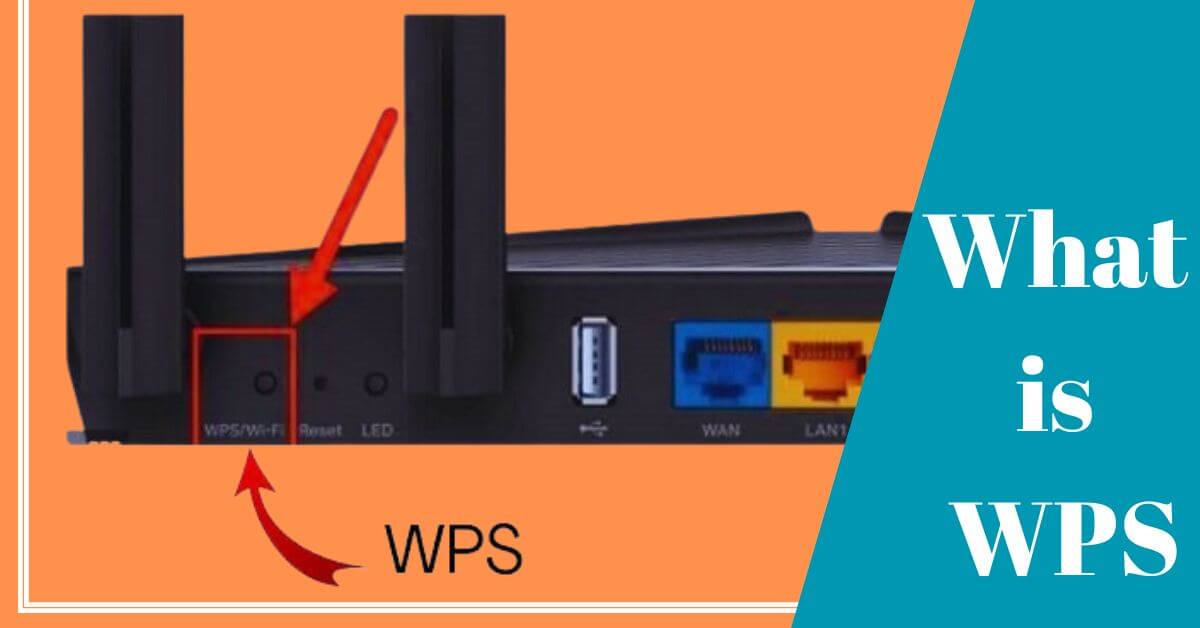
- Press WPS Button: On the Wi-Fi router or access point, locate the WPS button, usually labeled with the WPS logo. Press the WPS button.
- Activate WPS on Device: Within a specific timeframe (usually a few minutes), go to the Wi-Fi settings on the device you want to connect and initiate the WPS setup process. This can usually be done through the device’s Wi-Fi settings menu.
- Automatic Connection: The device and the Wi-Fi router communicate with each other, exchanging the necessary information to establish a secure connection. This process is automated and typically takes a few seconds.
- Connection Established: Once the authentication is successful, the device is connected to the Wi-Fi network.
WPS PIN Method
The WPS PIN method provides an alternative way to establish a Wi-Fi connection, primarily used when devices don’t have a physical WPS button.
- Generate WPS PIN: Access the router’s WPS settings through its administration interface and generate an eight-digit PIN.
- Enter PIN on Device: Go to the Wi-Fi settings and activate the WPS setup process on the device you want to connect. Choose the PIN method and enter the eight-digit PIN generated by the router.
- Authentication: The device sends the entered PIN to the Wi-Fi router for verification.
- Connection Established: If the PIN is correct and the authentication is successful, the device is granted access to the Wi-Fi network, and the connection is established.
It’s important to note that some routers may have variations in their implementation of WPS, and not all devices support both the push button and PIN methods. Additionally, due to security concerns associated with the WPS PIN method, some routers may have security measures, such as lockouts or temporary PINs, to mitigate potential vulnerabilities.
Security Concerns with WPS
While WPS (Wi-Fi Protected Setup) offers convenience, it has been associated with several security concerns. Understanding these vulnerabilities is crucial for maintaining the security of your Wi-Fi network. Here are some key security concerns with WPS:
- Brute-Force Attacks: One of the primary vulnerabilities of WPS is its susceptibility to brute-force attacks on the WPS PIN. The eight-digit PIN used in the WPS PIN method can potentially be guessed through repeated trial and error, compromising the security of the network.
- Weak PIN Generation: Some routers have been found to generate predictable or weak WPS PINs, making them more susceptible to brute-force attacks. This vulnerability arises from improper implementation or inadequate randomization algorithms used in PIN generation.
- Lack of Lockout Mechanism: Some routers do not implement a lockout mechanism after a certain number of failed PIN attempts, making them more vulnerable to brute-force attacks. Attackers can repeatedly attempt different PIN combinations until they find the correct one, gaining unauthorized access to the network.
- PIN Disclosure: In certain scenarios, the WPS PIN may be disclosed inadvertently. For example, routers with a physical WPS button may display the PIN on the device’s screen during the WPS setup process, making it visible to potential attackers who are in close proximity.
- PIN Guessing: Attackers can also attempt to guess the WPS PIN based on known information, such as the router’s manufacturer or default PIN patterns. This technique exploits the lack of randomness in PIN generation and can facilitate unauthorized access to the network.
- WPS Deactivation: Disabling WPS entirely on the router eliminates the associated security risks. However, some routers may have WPS enabled by default, potentially exposing networks to attacks until users explicitly disable it.
- Firmware Vulnerabilities: Like any other networking technology, WPS can be susceptible to firmware vulnerabilities. Outdated or unpatched router firmware may contain security flaws that can be exploited by attackers to compromise the network.
It’s important to note that not all routers and devices are equally vulnerable to these security concerns. Manufacturers have made efforts to address these vulnerabilities through firmware updates and improved security practices.
However, to ensure the highest level of network security, it is generally recommended to disable WPS if it is not necessary for your specific use case and rely on alternative connection methods, such as manually entering the Wi-Fi network passphrase.
Configuring and Using WPS
Enabling and Disabling WPS on Routers and Devices
To configure and use WPS (Wi-Fi Protected Setup) on your router and devices, follow these steps:
Enabling WPS on Router
- Access your router’s administration interface by entering the router’s IP address in a web browser.
- Login to the router using the administrator username and password.
- Locate the WPS settings in the router’s administration interface. The exact location may vary depending on the router model and firmware.
- Enable the WPS feature by selecting the appropriate option or checking a box. Save the changes.
Enabling WPS on Devices
- On the device you want to connect to the Wi-Fi network, navigate to the Wi-Fi settings.
- Look for the WPS setup option. It may be labeled as “WPS,” “Wi-Fi Protected Setup,” or have a WPS logo.
- Activate the WPS setup process on the device. You may need to select a specific connection method, such as the push button method or the PIN method, depending on the device’s capabilities.
Disabling WPS on Router and Devices
- To disable WPS on the router, access the router’s administration interface and locate the WPS settings. Disable the WPS feature by unchecking the option or deselecting the checkbox. Save the changes.
- On devices, navigate to the Wi-Fi settings and disable the WPS setup option. This may involve turning off WPS or deselecting the specific connection method.
Setting up WPS on a Router
Follow these general steps to set up WPS on a router:
- Access the router’s administration interface by entering the router’s IP address in a web browser.
- Login to the router using the administrator username and password.
- Locate the WPS settings in the router’s administration interface. This is typically found under the wireless or security settings.
- Enable the WPS feature by selecting the appropriate option or checking a box.
- Choose the WPS connection method you want to use, such as the push button method or the PIN method.
- Save the changes in the router’s administration interface.
Connecting Devices Using WPS
Once WPS is enabled on the router, you can connect devices using the respective WPS connection methods:
Push Button Method
- On the device you want to connect, go to the Wi-Fi settings.
- Activate the WPS setup process.
- Press the WPS button on the router.
- The device and router will communicate and establish a secure connection automatically.
- Once the authentication is successful, the device will be connected to the Wi-Fi network.
PIN Method
- On the device you want to connect, go to the Wi-Fi settings.
- Activate the WPS setup process.
- Choose the PIN method.
- Enter the eight-digit PIN displayed on the router’s administration interface or provided with the router documentation.
- The device sends the entered PIN to the router for verification.
- If the authentication is successful, the device will be connected to the Wi-Fi network.
Note: The specific steps may vary depending on the router and device models. Refer to the router and device documentation for detailed instructions on using WPS.
What is WPS Wifi Connect?
“WPS WiFi Connect” refers to a mobile application or software designed to simplify connecting to a Wi-Fi network using WPS (Wi-Fi Protected Setup). It is commonly available as a mobile app for smartphones and tablets.
WPS WiFi Connect apps typically provide a user-friendly interface that allows users to easily connect to a WPS-enabled Wi-Fi network. The app simplifies the connection process by automating the steps to establish a secure connection, such as entering the network’s SSID (Service Set Identifier) and passphrase.
When using a WPS WiFi Connect app, users can typically perform the following actions:
- Scan for WPS-enabled networks: The app scans the surrounding Wi-Fi networks and identifies those that support WPS.
- Connect to a network: Users can select a specific WPS-enabled network from the list and initiate the connection process.
- Push Button or PIN method: The app offers the choice between the push button or PIN method for establishing the connection.
- Automated connection process: The app communicates with the WPS-enabled router to complete the necessary authentication and network connection steps.
- Connection status and details: Users can view the status of the connection attempt and access information about the connected network, such as network name, signal strength, and encryption type.
WPS WiFi Connect apps aim to provide a convenient and user-friendly solution for connecting devices to Wi-Fi networks, particularly for users who may find the traditional Wi-Fi setup process challenging or time-consuming. However, it’s important to exercise caution when using such apps and ensure they come from reputable sources to maintain the security of your network.
What Happens When I Press the Wps Button On My Router
When you press the WPS (Wi-Fi Protected Setup) button on your router, several actions occur to facilitate connecting devices trying to join the Wi-Fi network. Here’s what typically happens when you press the WPS button on your router:
- Activation of WPS Mode: Pressing the WPS button triggers the router to enter WPS mode, indicating that it is ready to establish a secure connection with a device.
- Signal Broadcast: The router starts broadcasting a special WPS signal to indicate its presence and readiness for WPS connection.
- Time Window: After activating WPS mode, the router usually maintains this mode for a specific period, typically a few minutes. During this time, devices can attempt to establish a connection using WPS.
- Device Interaction: Once the router is in WPS mode, you need to initiate the WPS setup process on the device you want to connect to the Wi-Fi network. This is typically done through the device’s Wi-Fi settings.
- WPS Handshake: When the device initiates the WPS setup process, it starts searching for nearby WPS-enabled routers. It detects the WPS signal emitted by the router in WPS mode.
- Connection Establishment: The device and router communicate with each other, exchanging the necessary information to establish a secure Wi-Fi connection. This process may involve encryption negotiation, authentication, and key exchange.
- Authentication: The router verifies the device’s credentials to ensure it has permission to join the network. This authentication step helps prevent unauthorized devices from connecting.
- Connection Confirmation: If the authentication is successful, the router sends a confirmation signal to the device, indicating that the connection is established.
- Connected Status: The device receives the confirmation and establishes a secure connection with the Wi-Fi network. It can now access the network and start transmitting and receiving data.
The specific steps and duration of the WPS process may vary slightly depending on the router model and firmware. Some routers may have additional security measures in place, such as temporary PINs or lockout mechanisms, to mitigate potential vulnerabilities associated with the WPS PIN method.
It’s important to note that while WPS offers convenience, some security concerns have been associated with its implementation. As a best practice, it is recommended to disable WPS if it is not required or to use alternative connection methods, such as entering the Wi-Fi network passphrase manually.
How to Enable Wps On Router
Enabling WPS (Wi-Fi Protected Setup) on your router can vary slightly depending on the router model and firmware. However, here are general steps that should guide you through the process:
- Access the Router’s Administration Interface: Open a web browser on a device connected to the router’s network. Enter the router’s IP address in the browser’s address bar. Common router IP addresses include “192.168.0.1” or “192.168.1.1”. If you’re unsure about the IP address, consult the router’s manual or look for it on the router itself.
- Login to the Router: You’ll need the administrator credentials to access the router’s settings. Enter the username and password when prompted. If you haven’t changed the default login credentials, you can usually find them in the router’s manual or on the manufacturer’s website.
- Navigate to the Wireless/Wi-Fi Settings: Look for a menu or tab related to wireless or Wi-Fi settings within the router’s administration interface.
- Locate WPS Settings: You should find an option for WPS within the wireless settings. It may be labeled as “WPS,” “Wi-Fi Protected Setup,” or have a WPS logo. Click on or select this option to access the WPS settings.
- Enable WPS: Once you’re in the WPS settings, you’ll see an option to enable or disable WPS. Check the box or select the option to enable WPS. Sometimes, additional options may be related to WPS, such as specifying the connection method (push button or PIN).
- Save Changes: After enabling WPS, make sure to save the changes you’ve made. Look for a “Save” or “Apply” button within the router’s administration interface, and click on it to apply the changes.
Once you’ve enabled WPS on your router, you can use the WPS method (either push button or PIN) on your devices to connect them securely to the Wi-Fi network.
Please note that the steps provided are general guidelines, and the exact process may differ depending on your router’s make and model. If you encounter any difficulties or need specific instructions, referring to the router’s manual or contacting the manufacturer’s support can provide more accurate guidance.
Common FAQs about WPS
Can WPS be disabled on a router?
Yes, WPS can be disabled on most routers. Accessing the router’s administration interface and navigating to the wireless or Wi-Fi settings should provide an option to enable or disable WPS. It is recommended to disable WPS if it is not required to mitigate potential security risks.
Is WPS supported by all devices?
While WPS is a widely adopted standard, not all devices support it. Most modern routers and devices, such as smartphones, tablets, and laptops, support WPS. However, some devices, especially older ones or those with custom firmware, may not have WPS functionality.
How secure is WPS?
WPS has been associated with security concerns and vulnerabilities. The WPS PIN method, in particular, is susceptible to brute-force attacks, PIN guessing, and other exploits. While manufacturers have implemented improvements and security measures over time, it is generally recommended to disable WPS if it is not necessary for your specific use case and relies on alternative connection methods, such as manually entering the Wi-Fi network passphrase.
Can WPS be used for guest networks?
WPS can be used to connect devices to a guest network if the router supports this feature. Some routers have separate WPS buttons or options specifically for guest networks, allowing guests to connect easily without accessing the main network. However, ensuring that the guest network is properly secured and isolated from the main network is important to prevent unauthorized access or potential security breaches.
What are the limitations of WPS?
- Vulnerabilities: WPS has been associated with several security vulnerabilities, such as weak PIN generation, susceptibility to brute-force attacks, and PIN disclosure. These vulnerabilities can compromise the security of the Wi-Fi network.
- Device Compatibility: While many devices support WPS, not all devices, particularly older or customized ones, may have WPS functionality. Compatibility may vary, and it’s important to ensure that both the router and the device support the desired WPS connection method.
- Setup Complexity: Although WPS aims to simplify the process of connecting devices to a Wi-Fi network, the setup process can still be complex for users who are not familiar with the WPS method or who encounter issues during the setup process.
How can I protect my network from WPS vulnerabilities?
To protect your network from potential WPS vulnerabilities, consider implementing the following measures:
- Disable WPS: If you don’t require the convenience of WPS, it is generally recommended to disable it on your router. This can help mitigate the associated security risks.
- Update Router Firmware: Regularly update your router’s firmware to ensure you have the latest security patches and fixes. Router manufacturers often release firmware updates that address known vulnerabilities, including those related to WPS.
- Use Strong Network Encryption: Enable robust encryption, such as WPA2 or WPA3, on your Wi-Fi network. This ensures that even if WPS is compromised, the encryption provides an additional layer of protection for your network.
- Implement a Strong Password: Set a strong and unique password for your Wi-Fi network. Avoid using default passwords or easily guessable passwords. A strong password makes it harder for attackers to gain unauthorized access to your network.
- Regularly Monitor Network Activity: Keep an eye on your network for any suspicious or unauthorized activity. Regularly review the connected devices and network logs to identify any potential security breaches.
WPS can be used without a physical button on some routers that support alternative methods for initiating the WPS setup process. This can include using a virtual WPS button through the router’s administration interface or using a PIN method to establish the connection.
Does disabling WPS improve security?
Disabling WPS on your router can improve the security of your network. By turning off WPS, you eliminate the associated vulnerabilities and potential risks that can be exploited by attackers.
Can I use WPS with a wired connection?
WPS is primarily designed for wireless connections and simplifying the process of connecting wireless devices to a Wi-Fi network. It does not have a direct application for wired connections, as they typically require manual configuration. WPS is primarily used for wireless connections between routers and wireless devices.
In conclusion, WPS (Wi-Fi Protected Setup) is a feature designed to simplify the process of connecting devices to a Wi-Fi network. It offers convenience by providing easy and quick setup options, such as the push button or PIN method. However, it is important to be aware of the limitations and security concerns associated with WPS.
We discussed the purpose and benefits of WPS, including its ability to streamline the connection process and make it more user-friendly. We also examined how WPS works, including the steps involved in the push button and PIN methods.
However, it is crucial to acknowledge the security concerns related to WPS. Vulnerabilities, risks of unauthorized access, brute-force attacks, and security flaws have been associated with WPS. These concerns highlight the importance of taking appropriate measures to protect your network.
Our recommendation is to disable WPS on your router if it is not necessary for your specific use case. Disabling WPS eliminates the associated vulnerabilities and reduces the risk of unauthorized access. Additionally, keeping your router’s firmware up to date, using strong network encryption, implementing a strong Wi-Fi password, and monitoring network activity are essential steps to enhance the security of your network.
While WPS offers convenience, it is important to weigh the benefits against the potential risks and make an informed decision based on your specific security requirements. By prioritizing network security and implementing recommended measures, you can enjoy a safe and secure Wi-Fi environment for your devices.

Information Security Asia is the go-to website for the latest cybersecurity and tech news in various sectors. Our expert writers provide insights and analysis that you can trust, so you can stay ahead of the curve and protect your business. Whether you are a small business, an enterprise or even a government agency, we have the latest updates and advice for all aspects of cybersecurity.